Level Designing an Adventure game
Designing levels in video games is always a challenge. This is especially true in adventure games, as the level must not only fit with the game mechanics, but also into the narrative. In this article, I will describe my design process for the house as well as the exterior of “The Ritual”.
Working with the Narrative Design Team
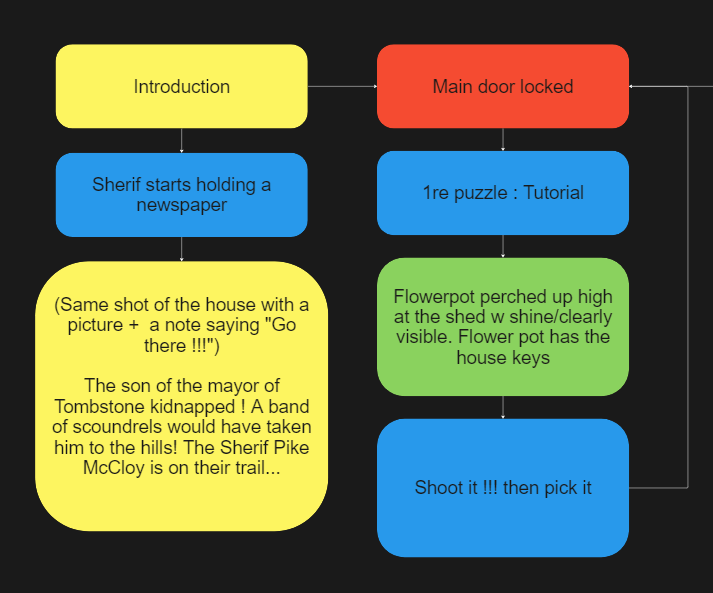
The first step in designing an adventure game level was to first conceptualize and note down our narrative. To do this, we first brainstormed on the of our story beats. This type of brainstorming is usually done with both the level design and narrative design teams. The idea was to discuss puzzle solutions, their meaning and what the player will need to do. We used a simple flowchart to do this:

To help us organize our story beats, we used a nice simple color code that helped us visualize every puzzle and challenge the player will have to overcome.
Making a narrative flowchart helped us decide what type of objects players will interact with throughout the story. This is a crucial process, since we’ll start from there in order to start our level design. It will also help out planning out the player’s golden path (where we ideally want our players to go) and plan their movement through the game.
Initial plans draft
After planning the narrative, we then had to do a draft. Personally, I like to make a 2D version of my level on physical paper first. This is especially useful since modifying a plan on physical paper is very easy: just take an eraser and erase! You can do this on any kind of paper, but personally I prefer grid paper: it’s really easy to set a scale and work on metrics.
At this stage, it is very easy to iterate on the initial plans. If the team notices any inconsistencies or doesn’t really like any part of the design, it’s easy to erase and redraw. If they feel like it, other team members can also pick up the pencil and sketch their ideas on the same paper.
Here is our paper draft for our main house:

One thing to note is that if you use symbols or color codes in your plans, make sure your team understands them! Otherwise, they might misinterpret your level and it might bite you back later.
Designing Organic Levels and Exteriors: The String Trick
Planning on grid paper might be a good idea for man-made structures: things like houses, buildings, cities… All of these can easily be put on paper without any problems.
However, for organic level design, that couldn’t be further from the truth! So to help us create truly organic levels, we need to take a different approach.
There are many different tricks used by level designers to create an organic landscape. I’ve heard of using rice to trace and build a kind of 3D model of the level, but personally I’m a big fan of the string method.
Basically, I always have a tied-up yarn string nearby. The idea is to crumple the string and toss it on a flat surface. We then use our fingers to lightly move the string into interesting shapes. Finally, we just need to trace its outline and we will have a basic organic outline that we can easily use anywhere.

You can also use this method to “draw out” an interesting golden path and then build your level along the way in very interesting ways.
Personally, I like to take a photo of the string and load that into a vector graphics editor (Inkscape is my personal favorite). I then make some outlines and show them to the team. When, we vote on them and select the one we like the most.
For “The Ritual”, I created 9 different organic shapes and put them to a vote. In order to create more interesting shapes, I also “layered” different photos of strings and drew their outline directly in Inkscape.

Out of the bunch, #9 was the most popular, so we went for it.
L0
Once the paper drafts are done, we finally put them into proper L0s. For those who don’t know, level design is usually done iteratively. With each iteration, some changes can be made to slightly improve the level. Each iteration is named as “L<iteration number>”, so because these are basically the initial plans and no levels are in the game just yet, we name this first iteration “L0”.
I personally prefer to do an “L0.5” with a paper plan first and then take the time to digitalize it, but you can forgo the digitalization and use your paper plan as your “L0” or do it digital only. Either way, the idea is that your L0 isn’t in the game yet.
This is the part where you can really start placing props and really planning out the golden path. Personally, I like adding the golden path as a separate layer: it really helps to identify choke points and frequently taken routes while being able to hide it. This way I can make sure the level isn’t too cluttered where it needs to be while adding detail where it needs to be.
We can still change and adapt the level at this stage and the process is completely transparent and open. So everyone can propose their ideas at any point.
Main House
By far the most important level of the game was the main house, so it was very important to make the L0 as clear as possible and really put our all into it.
Here is our L0 for the main house:


Exterior
Because our exterior is an organic level, we had to use a different approach for its level design. This meant that our exterior L0 uses different color codes and so on.
For example, because our house was separated into floors, we didn’t need to show its elevations. However, we do need to show the terrain elevation for our exterior because organic terrain is rarely flat.
To do this, there are many different techniques. I prefer to use shades of gray to indicate different elevations, so our exterior L0 has many different shapes with different shades of gray
Like the house L0, it’s also the time to place our props. Here we use different types of dots for each type of props, namely green for plants, and magenta for digging spots. I have also added our golden path to fully visualize and identify the most used routes and the various choke points. As I said before, this was mostly used to ensure proper flow and reduce level complexity where it matters.
I also added the outline of the house and a colored path to help the level artist plan the terrain.

Blocking
Then comes the blocking phase. This is where you take your L0 and start adding it to your game. The main purpose of this step is to “get a feel” for the level’s scale. The most important thing to do at this stage is to playtest frequently. Most engines can allow you to play your game directly in the editor, so don’t hesitate and press play as often as possible! There are many ways to accomplish this, but here’s what I like to do.
I usually import my L0 directly into the engine and apply it as a texture to a quad that I add to my level. Then I scale it up and press play. Walking around the L0, I can easily “get a feel” of its scale, stop, readjust its scale, and press play again. I rinse and repeat until I am satisfied.

Once the scale was figured out, I start adding the walls as base cubes. I then do the whole “get an feel” thing again until I’m satisfied with the walls.
This is where we establish the scales, positioning, and most importantly, the feel of the level. It’s also at this stage that you should listen to your instincts the most: if you have a nagging feeling about the blocking, there’s still time: you can still change it easily! But whatever you do, don’t forget to playtest! You can even playtest with other team members and listen to their feedback.

As for the exterior, because it usually requires slopped terrains, the blocking usually consist only of a basic plain. However, in our case, we won’t really need to do anything, since we’ve already have a quad acting as our plane.
L1
Then comes the L1. In this iteration, the level starts to be more defined with some amount of props and more detailed level geometry.
At this point we also start to slowly implement and add most of the interactive objects the player needs to play the game. This means we start to get a semi-complete game loop but with mostly placeholder objects.
It’s at this point that we also start to really think about what the player sees and whether our intended golden path is correct or not. Playtesting is also crucial at this stage: this is where we “get a feel” of what the player is seeing at any given time and whether that helps or hinders gameplay. This is also where level artists start planning what they will need to do for the level.
Here’s an overview of our L1s:

L2
For the purpose of a two-week game jam, L2 is really our final stage of level design. At this point we have a complete game loop: the level can be played from start to finish in a more or less complete state.
This is where a level designer’s job ends and a level artist’s job begins. The level art really starts at this point, and it’s also when the narrative team starts replacing placeholders texts with the final ones.
Making a change at this stage is quite difficult and dangerous. Making level art is one tough cookie, hence why level design take places in so many step: it’s easy to change a drawing or move simple cubes, but to change an entire model, not so much…
Nevertheless, you can still make some minor changes to the level at this point, like adjusting the position of some interactive objects and whatnot.
In more “complete” productions, there are many more level iterations. In some cases, it can even go as far as L4! However, these later iterations usually consist of iterating level art. In other words, nothing a level designer can really do.
Conclusion
Making video game levels is an involved process, where everyone can participate and help create fun and interesting levels. While level design generally revolves around how designers can use game mechanics to create fun levels, in adventure games it’s much more about making the story play out. This required our level design and narrative design teams to work together to create levels that were not only fun to play, but also served their purpose for the game’s story.
Overall, I like to think that while level design and narrative design might seem totally different at first, they are actually two side of the same coin. In order to create cohesive games, everyone has to work together, not only level and narrative designers, but also programmers, artists and sound designers. A game is rarely made by only one person: by working as a team, we can always make better games.
Get The Ritual
The Ritual
Play as a western sheriff investigating the disappearance of the mayor's son and finding more than he asked for.
| Status | Released |
| Authors | jbdev95, Goblin_Vee, ThatMaho, Dj4immortal, axistedaxe, V. Dubois, Rentora, Ryuu133 |
| Genre | Adventure, Puzzle |
| Tags | 3D, Animals, First-Person, Low-poly, Narrative, Singleplayer, Unreal Engine, Western |
| Languages | English |
More posts
- Doggo Vision, or to simulate how dogs seesJun 12, 2023

Leave a comment
Log in with itch.io to leave a comment.